
I’m here today to show you how I paint colorful whites by focusing on shapes, values and edges.
I want to thank Daler-Rowney for sending me Aquafine watercolors to use for this tutorial. The intense color was perfect for it.

Before We Start
For inspiration, I’m using the reference photo above by Annette Meyers at Pixabay (the link is below).
I say ‘inspiration’ because I don’t intend to paint a realistic likeness. My painting is more abstract, and I’ve made little effort to represent cherry blossoms. The purpose of this tutorial is showing how to create colorful whites and light. I’ve simplified the subject to concentrate on that rather than on detail and technique.
Video
Contrast
How do you create colorful whites? Your first thought is probably color. You aren’t wrong, but that’s only part of it. The real determining factor is contrast, and there is more than one kind.
- Hues – the colors — the colors of the object, in the reflected light, and in the shadows
- Values – the range of light to dark
- Shapes – blocks of values
- Edges – Hard Edges, Soft Edges and Lost & Found Edges
- Chroma – the range of bright to dull
Okay – I’ve identified the types of contrast, but you may be saying “huh”? I’ll try to explain as I go.
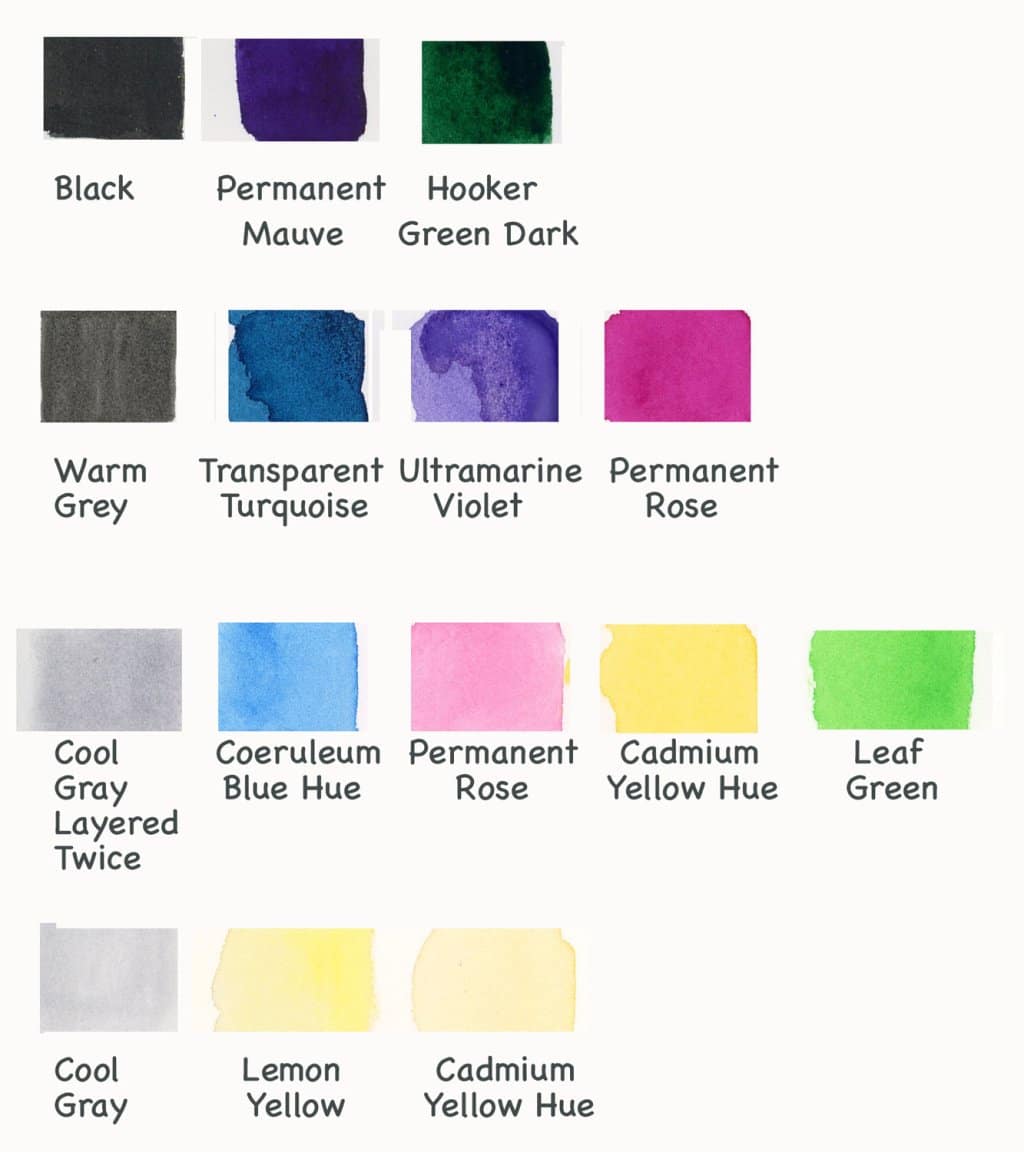
Tools

- Aquafine Watercolor
- (the Hues we’ll use)
- Lemon Yellow
- Permanent Rose
- Coeruleum Blue Hue
- Permanent Mauve
- Hookers Green Dark
- Leaf Green
- (the Hues we’ll use)
- Saunders Waterford Cold Press Watercolor Paper
- Princeton Quill Synthetic Squirrel Size 4
- Princeton Velvetouch Round Size 10
Five Value Sketch

I did this quick value sketch using gray-toned markers, and highly recommend doing one before starting your painting. They don’t have to be great. It’s the shapes and values that count.
There are five values — black, white, dark gray, medium gray and light gray.
Looking at the reference photo, I looked for the darkest areas, and drew them all as black. I repeated this with the grays. In other words, I looked for blocks of value, and drew all those shapes together as one, rather than drawing the blossoms or leaves. I ignored all detail, and just drew shapes.
Drawing these shapes helped simplify the painting and gave me a guide to the different values. There are more than five values in the reference photo. I had to decide which to use, and mass the closest ones together. If I wanted to paint something more realistic, I’d break this down into more values.
Value to Color
Next I took the same markers and drew a square for the black and three grays. The white will be the color of the paper so it wasn’t needed here.
Beside the black and grays, I paint a square of a few colors that looks like it has the same value. The same color can be used for different values. You just use more water to lighten as needed. This helps you plan how much water to use as well as figuring out which colors work for each value.
I had a pretty good idea of the colors I wanted, having already done similar charts. But the whole point of the this chart is to help you choose the right colors for your values. The more colors you try, the more you’ll learn, and the more confident you’ll be. And you can mess up on the chart, so that you won’t mess up the painting.
After I did this chart I decided that I didn’t want to use the Cadmium Yellow Hue. Once you figure out the colors for each value, you might want to do a chart to keep for reference (then you don’t have to keep doing them so often).
Edges and Chroma

I’ve cropped a few areas from the finished painting to explain edges and chroma.
1. This is an example of hard edges. There is a clear and abrupt change between white, purple and blue. The purple and white have an extreme contrast in value. The edges between white and blue are distinct but have less contrast, and the same is true between purple and blue. It’s good to have a variation in the value contrasts.
2. This is mostly an example of soft edges. The edges between the colors are pretty distinct but not sharp — those are soft edges. With some edges it is hard to be sure where one color ends and the other color begins — those are lost and found edges.
3. This example has all three edges. Can you see them?
4. This also has all three kinds of edges, but it also has a distinct change of chroma. The yellow-green is light and bright, but at the top it turns dull. You don’t want to overdo the dull areas, but they give the eye a rest and make the other colors seem brighter by contrast.
Let’s Get to the Painting

At last!
I kept my sketch simple. My aim was to make sure my blossoms fit on the paper, and where each blossom began and ended. I added the center, since that will be the focus. I punched up the values so the pencil lines would show up here, but in real life, I could barely see them.
The Blossom Interior

For this part of the painting, use a paint to water consistency of thin milk — think 1% milk. We’ll be letting the colors blend on the paper so we create lots of soft and lost & found edges, rather than mixing colors on the palette.
- Coeruleum Blue Hue
- Lemon Yellow
- Permanent Rose
I used my synthetic squirrel quill brush because the soft bristles hold lots of water and paint.
1. Starting with the blue, block in the center of the middle blossom. Remember to leave room so you’ll have plenty of white petal left between the colored center and the background.
At this point, keep your value sketch and the reference photo where you can look at them, but as much as possible work from memory. This will help you paint just the value blocks, and keep you from being lured into adding detail. Trust your imagination!
2. Add a little yellow in the center of the middle blossom. Keep it juicy so it flows into the blue.
Paint the shadowed part of the right lower blossom. Be sure to leave some white between it and the middle blossom.
3. Going back to the middle blossom, start adding rose where you want to imply the shadows of petals and leaves behind the front petals. Let the color run into the blue.

4. Add a little bit of the rose around the yellow to create a lower chroma.
5. Add some rose to the bottom of the left hand blossom to imply shadow.
For all three colors, create a thicker mix of paint to water consistency — think whole milk.
6. Paint the underside of the right-hand blossom. Paint the whole area with blue. Drop in yellow in the upper half, and rose in the bottom half.
Let it all dry. We’ll do the background next, and we don’t want those colors running into the interior colors.
The Background

- Lemon Yellow
- Leaf Green
- Hooker Green Deep
- Permanent Mauve
When you start painting now, be sure to leave plenty of white between the background and the interior of the blossoms. Very important. Don’t ask me how I know this, lol.
7. To create a feeling of light coming from the upper light and shining through the blossoms, paint some vaguely leaf-shaped areas in the upper left and bottom right.
Try to imply foliage through these vague shapes, rather than actually painting leaves and stems.
I now switched to my Velvetouch round size 10. It still holds quite a bit of water and paint, but it’s stiffer and will give me less juicy coverage.
8. Paint leaf green around the yellow, letting the colors flow together, but keep some of the yellow pure.
Paint hooker green dark next to the leaf green. Switch to permanent mauve after you’ve covered an inch or two of the dark green.
Continue to alternate between the colors until you’ve covered the entire background.
Let the painting dry.
Optional techniques
When I was painting, I accidentally dropped some purple onto my blossoms. I lifted some of the purple with a damp brush and tissue, but it is a staining color, so I used titanium white to lighten the color after it dried. Then I dry brushed some white over a few other areas while I was at it. Some people believe the only white should be the white of the paper. That’s fine (and correct for some techniques). I believe in using the tools that let me do what I want. I wouldn’t want to use very much white in this painting. But it worked perfectly to cover up my big blotch.
I also set up a couple areas of bokeh light on the left-hand side. That’s the unfocused background light you often see in photos. I added spots of yellow, circled it with green, and then with purple. This is a nice effect that adds interest without competing too much with your main focus.
9. You are almost done, but now is the time to study what you have and think about the finishing touches. You may or may not need to do the steps I’ve done. I decided I needed to:
- Separate the blossoms
- Change the chroma of the light areas in the background.
- Deepen the shadows in the blossom interiors.
- Add some shape to the left hand blossom.
- Add a little detail to the center of the middle blossom.
What do think you might need to do? If you aren’t sure, I recommend watching this part of the video completely before continuing yourself, so you have a better idea of the possibilities. Don’t feel you have to do everything I did, if you feel it’s already done.

10. First, I used blue to separate the middle and right-hand blossom. I didn’t want a solid line, so I painted small shapes on each side and in the middle to achieve this.
11. At this point, I rinse my brush thoroughly, wet it with water and blot it on a towel so I have a damp brush. I felt the lighter areas were competing with the white of the petals, so I wanted to make the yellows and light green duller.
With the damp brush, I picked up a bit of dark green and pulled it into the lighter colors. I move around the entire background, picking up small, small amounts of dark green and purple and using them to dull the light.
TIP: If your colors get too muddy when doing this, you probably have too much water on your brush and are mixing the colors too completely. You might also have chosen colors that create ugly colors when mixed.
For the bokeh spots, I blot them with the damp brush, then a tissue, working around the edge of the yellow, then the edge of the green. I pull some green into yellow, some yellow into green, doing the same with the green and the purple. I do this until I feel the edges are softened enough.
12. Since the center of the middle blossom is where I want my focus, I finish with just a little bit of detail making sure I have contrast of hues, values, edges, shapes, and chroma, all in that little area.
And I was done! If you find yourself going back and forth, and just unsure — stop. I’ve seen some news features lately about ‘decision fatigue’. They’re talking about choices caused by the pandemic and inflation of course. But it is just a valid for painting. After a while, your brain just can’t make good decision about your painting, so give it a break.
Put the painting away for a couple of days and then look at it. You’ll like it better.
Where Do You Go From Here
You may be wondering what to do now, if you want a more detailed and realistic painting.
Look for more contrasts, more values, more shapes and ways to use the different types of edges. It’s best not to get too focused on detail (says the person who frequently does, lol). Start out with simple paintings. Gain confidence in matching your colors to the values. Then try adding more complexity.
If I find a reference too confusing, I often use photo manipulation, turning the reference photo into black and white to see values, or into a cut-out filter to see shapes. I up the saturation to help me see where I can add colors, and what hues I might use.
And if you’re getting frustrated – simplify.
I hope you’ve enjoyed this tutorial.
Links of Interest
- REVIEW: Saunders Waterford Watercolor Paper Blocks
- REVIEW: Aquafine Watercolour From Daler-Rowney in Tube and Pans
Reference Photo
Image by Annette Meyer from Pixabay.
Tools
- Aquafine watercolors – Tubes
- Saunders Waterford Block 300gsm Cold-Press/NOT
- Princeton Artist Brush, Neptune, Synthetic Squirrel Watercolor Paint Brush, Quill, Size 4
- Princeton Velvetouch, Series 3950, Paint Brush for Acrylic, Oil and Watercolor
Disclaimer
I was given a 36 tubes of Daler-Rowney Aquafine watercolor to use for this tutorial. I received no other considerations, though this post may contain affiliate links which help support Doodlewash. As always, all opinions expressed are my own.


I did enjoy this tutorial. Thank you, Sandra!
Thank you so much, Laura!
Beautiful and more products I’d like to try!
Thank you! The quote needs to be changed to ‘So much to buy, so little money!’, lol.
Great tutorial Sandra.
Thank you, Karen!
Sandra, this is one of the best tutorials I’ve ever read and so appropriate because one of your most outstanding artistic gifts is the way you render white. I’ve often told you how much I admire your skill. Also, your discussion about bokeh areas is brilliant. Thank you for useful instructions that I intend to try.
Thank you so much, Shari! It makes my day knowing that someone found my tutorial useful!
A wonderful tutorial, Sandra! It was amazing to watch those flowers develop and loved hearing you explain the process!!! Excellent!!!
Thank you so much, Mary! I’m so glad you enjoyed the tutorial!
Great tutorial!! Thank you, Sandra.
Thanks a million, Cathy!
Hello Ms. Sandra,
Thank you so so much for such an amazing and easy to understand tutorial!!! I love all your posts but I love your tutorials the best. I’m not feeling brave enough to try painting this but you privided the most valuable lesson on how to read whites and edges. Thanks a ton for that!
Love,
Mugdha
Thank you, Mugdha! If this seems too difficult, you might try a non-objective painting with random shapes, just to get the feel for painting light. You can never simplify too much!
Thank you Sandra for another great tutorial. You have clarified the technical terms for me and I will be printing it out as a guide and I will give this project a go – your breakdown makes it seem achievable – nothing ventured nothing gained 🙂
Thank you so much, Claire! Enjoy painting your flower. That’s the important part!
Thank you Sandra 🙂
Much appreciated, Brenda!
Awesome!!
Thank you, Varsha!
Thank you for this video. I learned a lot by watching and will give it a go. 😊👍🏻🎨
Thank you, Janet! Have fun painting your flower!
Magnificent tutorial. Thanks so much!
Your kind comments are so appreciated, Richard!
Another exellent tutorial. The part about searching the values is really useful for beginners like me. Thank you so much for teaching us this lesson.
My pleasure, and thank you for commenting!
Thankyou Sandra for such an excellent tutorial.
I can’t wait to give this tutorial a try! Thank you.
Thank you! I can’t wait to see what you do!